Start here
What graphics settings should you try first?
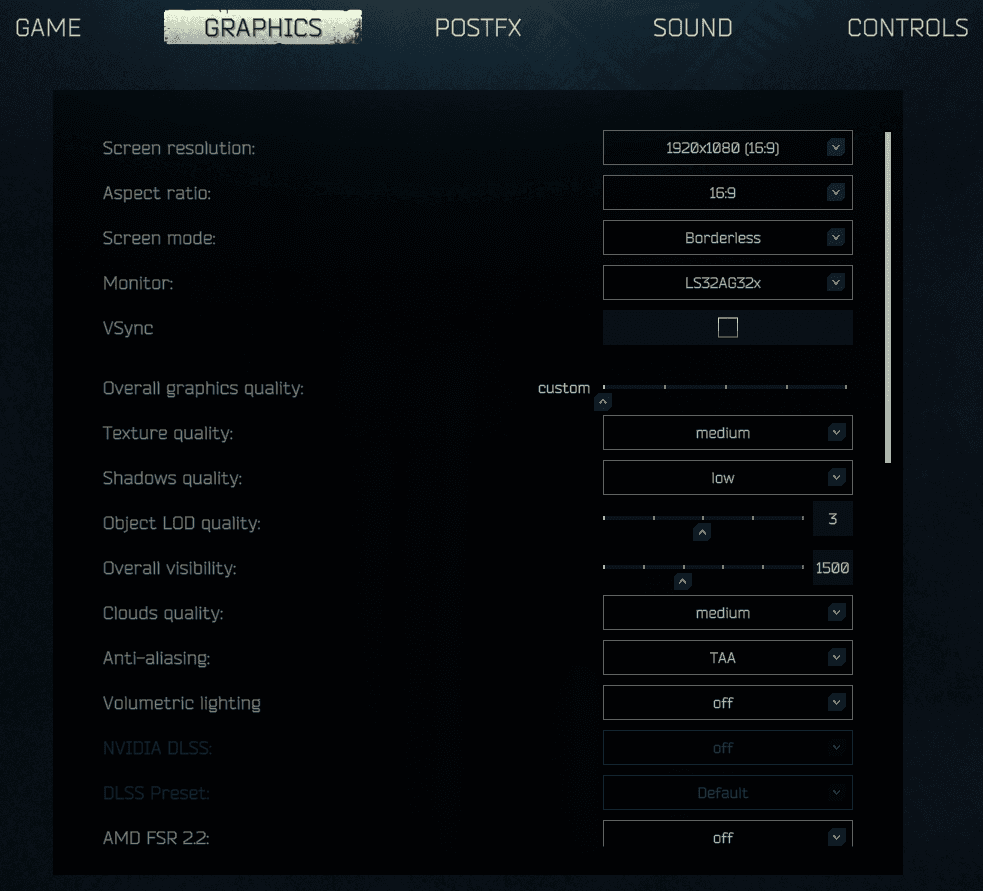
For most modern gaming PCs, start with native resolution, fullscreen, VSync Off, Texture Quality High, Shadows Medium, Object LOD around 2.5–3, Overall Visibility around 1500, Anisotropic Filtering On and Z-Blur, Noise, Chromatic Aberrations and Grass Shadows disabled. Set HBAO and SSR to Off or Low and Volumetric Lighting to Low. Enable DLSS or FSR only when the GPU is the limit: an upscaler will not solve CPU-bound stutters.
- Find the bottleneck first: lowering image quality may barely help if the GPU is not fully loaded.
- Textures depend mostly on VRAM, while shadows, LOD and visibility can affect CPU and GPU load.
- Disable effects that change the image without providing useful information: Z-Blur, Noise and Chromatic Aberrations.
- Do not put everything on Low automatically; it can reduce clarity without fixing the real bottleneck.
- At 1080p, do not enable DLSS only for a higher number if the GPU is not the limit and the image becomes soft.
- Check camera movement, building interiors and the heaviest maps, not just average FPS in a quiet scene.
How to identify the FPS bottleneck
The same FPS number can come from different problems in Tarkov. One system may be GPU-limited, another may be limited by a CPU core, memory latency, RAM or asset streaming. That is why putting every option on Low is not a complete optimization strategy.
Start by watching GPU utilization, VRAM usage, frame rate and frame time. If the GPU stays near 95–99%, you are probably GPU-bound. Lower resolution, use DLSS or FSR, reduce shadows and disable expensive lighting effects.
If GPU utilization is much lower while FPS is still poor, investigate the CPU, memory or the scene itself. Lowering texture quality often changes very little in that situation. Start with Object LOD, Overall Visibility, shadows and extra effects, then close background applications.
Use the same map, resolution, window mode and route for comparison. An offline raid is useful for the first test, but it does not perfectly reproduce an online raid, so confirm the result in normal gameplay.
- GPU 95–99%: start with resolution, DLSS/FSR, shadows and lighting.
- GPU well below 90% with low FPS: check CPU, RAM, LOD, Visibility and background processes.
- Drops during camera turns and building entrances matter more than a pretty average FPS number.
- Do not compare different maps: Streets, Lighthouse and Interchange create different loads.
| Symptom | Check | First change |
|---|---|---|
| GPU stays around 95–99% | Resolution, VRAM and expensive effects | Lower resolution or try DLSS/FSR Quality, then test shadows and lighting. |
| GPU is below 90% but FPS is low | CPU, RAM and background processes | Lower Object LOD, Overall Visibility and shadows; disable recording and overlays. |
| Stutters after turning the camera | Frame time, texture streaming and VRAM | Compare Texture Medium/High and Mip Streaming in the same scene. |
| Low average FPS only on Streets | LOD, Visibility and scene density | Create a separate Streets profile; do not lower textures without signs of VRAM pressure. |
| FPS improved but the image is soft | Upscaler and internal resolution | Return to Native or Quality and remove extra driver sharpening. |
Basic display settings
Use your monitor's native resolution when the system can handle it. Lower resolution does reduce GPU load, but it also makes distant silhouettes, optics and small loot details harder to read. At 1080p, tune the preset first before deciding that an upscaler is necessary.
Fullscreen is a useful baseline for latency and resolution testing. Borderless is more convenient for Alt+Tab, but it can behave differently with HDR, VRR and overlays. Do not change the window mode together with five other settings or the comparison becomes unreliable.
VSync is not a universal smoothness setting. If you have G-Sync or FreeSync, configure the FPS limit and VRR as a complete setup. If minimum latency is the priority, start with VSync Off and test the result.
Keep Aspect Ratio matched to the monitor. A stretched image changes the visual feel, but it does not add real detail and cannot replace a proper resolution choice.
- Screen Resolution: native resolution.
- Screen Mode: Fullscreen for a baseline test; Borderless for easier Alt+Tab.
- VSync: Off as a starting point for lower latency.
- Aspect Ratio: the monitor's native format.
Texture Quality, memory and Mip Streaming
Texture Quality mainly consumes VRAM. When the GPU has enough memory, High can look noticeably better than Medium without a major FPS loss. When VRAM is not enough, you may see texture swaps, streaming spikes and unstable frame time.
For a GPU with limited VRAM, start with Medium before lowering every other option. Low reduces memory use but makes surfaces harder to read and does not fix a CPU-bound scene. The right threshold depends on resolution, the map and the rest of the loaded assets.
Mip Streaming is worth considering when the game does not fit comfortably in VRAM. It can reduce peak memory use, but streaming textures during movement may introduce additional frame-time spikes. If VRAM is sufficient, test the game without it first.
Do not confuse VRAM pressure with a lack of system RAM. With 16 GB of RAM, Tarkov can hit the page file more often, especially alongside a browser, recording software and heavy maps. Stable performance depends on more than the GPU model.
- 4–6 GB VRAM: start with Medium and test Mip Streaming instead of assuming it helps.
- 8 GB VRAM: High is often reasonable at 1080p and 1440p if there are no streaming spikes.
- 12 GB VRAM or more: High is a sensible baseline; texture quality is rarely the first setting to lower.
- Check frame time after turning the camera, not only the VRAM percentage.
Shadows, Object LOD and Overall Visibility
Shadows Quality is one of the first options to reduce when the GPU or a mixed load is the problem. High shadows can improve lighting detail, but they are expensive around foliage and dense scenes. Medium is a sensible baseline; Low is useful for a weak PC.
Object LOD controls how early distant objects switch to simpler geometry. Too low can make the scene feel less coherent and create obvious transitions. Too high increases the amount of geometry the CPU and GPU must process.
Overall Visibility does not need to be maxed for a competitive advantage. Higher distance is useful on open maps, but it increases the workload in heavy scenes. Start around 1000–1500 and raise it only after confirming stable frame time.
On Streets and other heavy locations, lowering LOD and Visibility can help more than dropping High Textures to Medium. On open Woods, an overly low visibility distance is more obvious.
- Weak PC: Shadows Low, Object LOD around 2, Overall Visibility 1000.
- Mid-range PC: Shadows Medium, Object LOD 2.5–3, Overall Visibility 1200–1500.
- High-end PC: Shadows Medium/High, Object LOD around 3, Overall Visibility 1500–2000.
- Do not raise Visibility together with SSR, HBAO and Volumetric Lighting without testing.
Anti-aliasing, Anisotropic Filtering and upscalers
Anti-aliasing changes edge quality and can affect performance. TAA usually produces calmer edges, but it may look soft while moving. If the image becomes blurry, check resolution and sharpening before stacking additional filters.
Anisotropic Filtering helps angled surfaces such as roads, floors, roofs and distant ground textures remain readable. It is usually safe to leave enabled because its cost is often lower than heavy lighting and reflection effects.
DLSS and FSR render an internal frame at a lower resolution and reconstruct the image. They are useful when the GPU is close to full utilization. If the limit is the CPU, an upscaler may barely change FPS while making the image less clear.
At 1440p and 4K, start with Quality. At 1080p, Native or Quality is usually easier to read because a lower internal resolution is more obvious on small objects. Performance modes are for a clear GPU bottleneck after you have checked the image.
- GPU-bound at 1440p/4K: try DLSS or FSR Quality.
- GPU-bound at 1080p: reduce expensive effects first, then test Quality.
- CPU-bound: do not expect DLSS/FSR to fix the problem; work on LOD, Visibility, shadows and background load.
- Do not enable multiple scaling systems at once.
Extra settings: what to disable first
Extra settings are effects that change the image or consume resources without helping you identify a player, read a map or control the weapon. They should be considered separately from core texture and geometry quality.
Z-Blur adds blur during movement and aiming. For competitive clarity, turn it Off. Noise adds grain, while Chromatic Aberrations color the edges of the frame. Both can be disabled without losing useful gameplay information.
Grass Shadows and Volumetric Lighting are more noticeable on a weak GPU and in heavy scenes. On a mid-range PC, Grass Shadows can usually stay Off and Volumetric Lighting can start at Low. On a high-end system, enable them for atmosphere only when the FPS reserve is real.
HBAO and SSR add ambient shading and reflections. They improve selected scenes but are not required for seeing players. Use Off on a weak PC, Low on a mid-range system and test Low/Medium on a high-end PC with the same route.
High-quality color affects color and post-processing quality, but it is not always the first option to disable. If frame time is stable, leave it On. On a weak GPU, test it together with Volumetric Lighting rather than turning it off automatically.
- Z-Blur: Off.
- Noise: Off.
- Chromatic Aberrations: Off.
- Grass Shadows: Off on weak and most mid-range PCs.
- HBAO: Off or Low.
- SSR: Off or Low.
- Volumetric Lighting: Off/Low on weak, Low/Medium on mid-range, Medium/High on high-end.
- High-quality color: On when stable; otherwise test it separately.
Three profiles for different hardware
These profiles are not tied to one exact GPU model. The combination of CPU, VRAM, system RAM and resolution matters more. If your system sits between categories, start with the lighter profile and raise one option at a time.
A weak PC is not only an old GPU. It can also mean 16 GB of RAM, 4–6 GB of VRAM or an older CPU that produces stutters and poor 1% lows. A mid-range PC is a modern 6–8-core system with 32 GB of RAM and roughly 8 GB of VRAM. A high-end PC has CPU headroom, 32 GB of RAM or more and a GPU with 12 GB of VRAM or above.
- Weak PC, 1080p: Texture Medium, Shadows Low, Object LOD 2, Visibility 1000, TAA, HBAO Off, SSR Off, Volumetric Off/Low, Grass Shadows Off, test Mip Streaming, DLSS/FSR Quality only when GPU-bound.
- Mid-range PC, 1080p/1440p: Texture High, Shadows Medium, Object LOD 2.5–3, Visibility 1200–1500, Anisotropic On, HBAO Low, SSR Low/Off, Volumetric Low, Grass Shadows Off, Native or Quality.
- High-end PC, 1440p/4K: Texture High, Shadows Medium/High, Object LOD around 3, Visibility 1500–2000, HBAO Low/Medium, SSR Low/Medium, Volumetric Medium, Grass Shadows optional, Native or DLSS/FSR Quality when GPU-bound.
- Streets profile: lower LOD, Visibility, shadows and Volumetric Lighting first; do not begin with Low Textures if the problem is CPU load.
NVIDIA, AMD and Windows settings
The driver should not duplicate the game with a stack of forced filters. Create a separate Tarkov profile and avoid enabling several latency, sharpening, scaling and frame-limiting systems at the same time.
On NVIDIA GPUs, use in-game NVIDIA Reflex when it is available and you want lower latency. There is no need to force an aggressive driver Low Latency Mode while also stacking third-party optimizers. Use the DLSS mode that keeps optics and distant objects readable.
On AMD GPUs, tune FSR and the in-game options first, then test Anti-Lag only in a combination supported by the current driver. Do not layer Radeon filters over PostFX without a separate comparison.
In Windows, disable unnecessary background recording, Xbox Game Bar capture, heavy startup apps and extra overlays. Discord, Steam, GeForce Experience, Radeon Software, a browser video and recording tools can affect frame time even when average FPS looks fine.
A maximum-performance power plan is not a universal fix. Check temperatures, clocks and throttling first. If the CPU or GPU is hitting a thermal limit, changing the graphics preset does not solve the cause.
- Keep one primary FPS limiter.
- Do not stack Reflex, driver Low Latency, a third-party limiter, recording and filters without testing the chain.
- Disable recording and overlays while benchmarking.
- Check temperatures and clocks, especially on laptops.
- After a driver update, recheck DLSS, FSR, sharpening and the per-game profile.
How to test changes correctly
Changing maps does not prove that a setting helped. Tarkov load varies with location, object density, weather, player distance and the current scene. Compare settings on the same route with several passes.
Record the baseline first: average FPS, perceived smoothness, texture streaming and the worst momentary drops. Then change one group at a time: shadows and Volumetric Lighting, then LOD and Visibility, then the upscaler.
Check three points: an open area, a heavy interior and a sharp camera turn. If the image is prettier only in the menu but turns stuttery or halo-heavy in motion, the setting did not improve the experience.
Play several normal raids after the initial test. Offline mode is useful for comparison, but real validation is stable performance in a normal match with your usual route, gear and background applications.
- Save baseline values before changing anything.
- Change one group of settings at a time.
- Track average FPS and smoothness, not only the maximum number.
- Repeat the test after major patches and driver updates.
A practical route
A one-evening optimization routine
Follow this order to get a stable profile without endlessly copying random presets.
Save the current profile
Write down resolution, window mode, textures, shadows, LOD, Visibility, anti-aliasing, upscalers and extra effects.
Check GPU and memory usage
Find out whether the limit is the GPU, VRAM, CPU or system RAM. That decides which settings to change first.
Disable unnecessary effects
Set Z-Blur, Noise, Chromatic Aberrations and Grass Shadows to Off. Start HBAO, SSR and Volumetric Lighting at Off or Low.
Match texture quality to VRAM
Choose Medium or High based on VRAM. Enable Mip Streaming only after checking that memory pressure is the real problem.
Balance LOD and Visibility
Start with Object LOD 2.5–3 and Overall Visibility 1200–1500. On heavy maps, lower them before lowering textures.
Add DLSS or FSR only when needed
Use an upscaler when the GPU is heavily loaded. Start with Quality and compare distant objects, optics and motion.
Check Windows and the driver
Disable recording, overlays and unnecessary programs. Do not apply several latency features and filters at once.
Save two profiles
Keep a main profile and a separate Streets/heavy-map profile so one difficult location does not ruin image quality everywhere.
Avoid these traps
Common Tarkov optimization mistakes
Most problems come from treating the wrong bottleneck rather than from one bad slider.
Putting everything on Low
This reduces texture quality and may barely help when the limit is CPU or memory. Tune the profile around the actual bottleneck.
Enabling DLSS on a CPU-limited PC
An upscaler reduces GPU work but does not speed up the CPU. If GPU usage is low, the image can become softer without a useful FPS gain.
Raising Visibility to the maximum
More distance does not always provide useful information, but it does increase work in heavy scenes. Start from a moderate value.
Judging only average FPS
Average FPS can look fine while camera turns and building entrances produce short stutters. Watch smoothness and frame time.
Stacking overlays and limiters
Reflex, driver Low Latency, a third-party limiter, recording and filters can conflict or make diagnosis harder. Test one chain.
Using one profile for every map
Streets, Woods, Interchange and Factory create different loads. A separate lighter profile for a heavy map is often better than lowering image quality everywhere.
FAQ
What are the best graphics settings for Tarkov?
Start with native resolution, VSync Off, High Textures when VRAM allows it, Medium Shadows, Object LOD 2.5–3, Visibility 1200–1500, Anisotropic On, HBAO/SSR Off or Low and Z-Blur, Noise, Chromatic Aberrations and Grass Shadows disabled. Then adapt the profile to your GPU or CPU limit.
How do I increase Tarkov FPS on a weak PC?
Find the system limit first. For a weak PC, start with Medium Textures, Low Shadows, Object LOD around 2, Visibility 1000, HBAO/SSR Off, Volumetric Off or Low and extra effects disabled. Use DLSS or FSR only when the GPU is actually the limit.
Does Tarkov need a stronger CPU or GPU?
It depends on resolution and the scene. The limit can be the GPU, a CPU core, memory or asset streaming. Watch GPU utilization and frame time instead of choosing hardware from one setting name.
Should I enable DLSS in Tarkov?
Only when the GPU is the bottleneck. At 1440p and 4K, start with Quality. At 1080p or during CPU-bound drops, DLSS can make the image softer without fixing the real problem.
What are extra or parasitic settings in Tarkov?
The term usually refers to effects and background functions that change the image or consume resources without adding useful information: Z-Blur, Noise, Chromatic Aberrations, excessive shadows, heavy reflections, overlays and screen recording.
Which settings should I disable first?
Start with Z-Blur, Noise, Chromatic Aberrations and Grass Shadows. Set HBAO, SSR and Volumetric Lighting to Off or Low, then test Shadows, Object LOD and Overall Visibility separately.
Should I enable Mip Streaming?
It is not a universal FPS boost. It can help when the game runs out of VRAM, but it can also add streaming spikes. If VRAM is sufficient, compare the game with Mip Streaming disabled.
How should I optimize Tarkov for Streets?
Use a separate profile and lower Object LOD, Overall Visibility, Shadows and Volumetric Lighting first. Keep Texture Quality at a level that fits VRAM because lower textures do not fix CPU-bound drops.
What settings work with 16 GB of RAM?
Close the browser, recording tools and extra overlays, watch page-file use and start with Medium Textures. If stutters remain, check RAM and VRAM pressure; a graphics preset cannot fully compensate for missing memory.
Are graphics settings connected to PostFX?
Yes, but they are different layers. Stabilize the base frame in Graphics first, then tune PostFX. Sharpening and color grading should not compensate for low resolution or unstable frame time.